TL;DR
Configure local DNS and reverse proxy to access self-hosted services using domain names instead of IPs and ports.
Prerequisites:
- Completed OPNsense setup
- Services running on your network
- Docker host for Nginx Proxy Manager
What you’ll set up:
- Wildcard DNS for
*.home.byteron.com - Nginx Proxy Manager for routing
- Optional SSL certificates for HTTPS
Typing http://10.0.10.100:8006 every time you want Proxmox gets old. This guide sets up local DNS so you use proxmox.home.byteron.com instead.
You’ll configure DNSmasq for wildcard DNS resolution and Nginx Proxy Manager to handle routing and SSL.
Note: This covers LOCAL domains only (*.home.byteron.com). Public-facing services with external DNS will be a separate guide.
Introduction
Typing http://10.0.10.100:8006 every time you access Proxmox gets old fast. This guide sets up wildcard DNS and Nginx Proxy Manager so you can use https://proxmox.home.byteron.com instead. Works for any self-hosted service - Portainer, Homarr, Home Assistant, anything running locally.
Architecture
graph TD
    Client[Client Browser] -->|DNS Query: service.home.byteron.com| AdGuard[AdGuard Home :53]

    AdGuard -->|Local domain query| DNSmasq[DNSmasq :5335]
    DNSmasq -->|Returns: 10.0.10.50| AdGuard
    AdGuard -->|Returns: 10.0.10.50| Client

    Client -->|HTTP/HTTPS Request| NPM["Nginx Proxy Manager
    10.0.10.50"]
    NPM -->|Route to backend| Service1["Service 1
    10.0.10.100:8006"]
    NPM -->|Route to backend| Service2["Service 2
    10.0.10.200:9000"]
    NPM -->|Route to backend| Service3["Service 3
    10.0.10.150:7575"]

    class AdGuard danger
    class DNSmasq neutral
    class NPM primary
    class Service1,Service2,Service3 info
Flow:
- Client requests
service.home.byteron.com - Query goes to AdGuard Home (port 53)
- AdGuard recognizes local domain, forwards to DNSmasq (port 5335)
- DNSmasq returns Nginx Proxy Manager IP (
10.0.10.50) - Client connects to NPM
- NPM routes request to the actual backend service based on the requested domain
Configure Wildcard DNS
Navigate to Services → Dnsmasq DNS & DHCP → Host Overrides
Click “Add” and configure:
| Field | Value |
|---|---|
| Host | * |
| Domain | home.byteron.com |
| IP Address | 10.0.10.50 (your NPM IP) |
| Description | Wildcard for local reverse proxy |
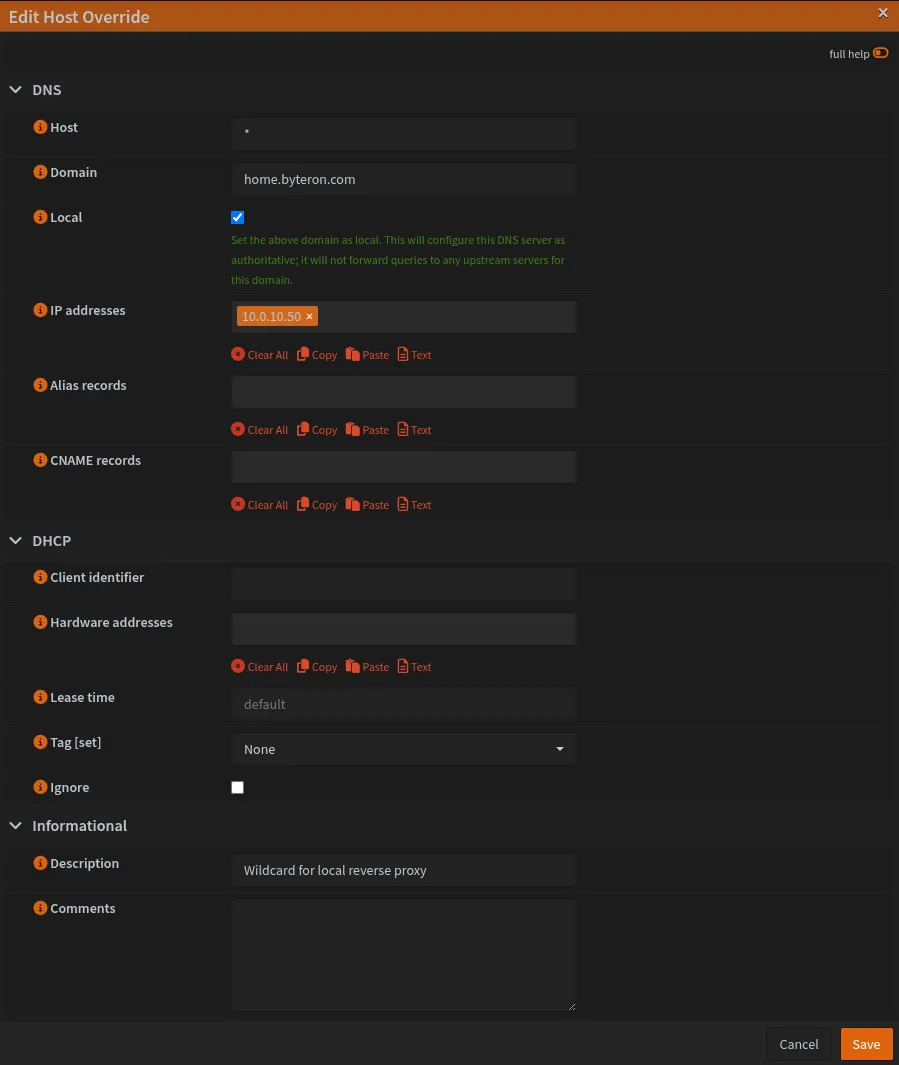
This wildcard catches ALL subdomains under home.byteron.com. If you need specific services on
different IPs, add individual host overrides - they take priority over wildcards.
Test DNS resolution:
nslookup npmlocal.home.byteron.com
# Should return: 10.0.10.50
Install Nginx Proxy Manager
NPM can be installed multiple ways (Docker, LXC, bare metal). This guide uses Docker Compose. See NPM documentation for other installation methods.
On your Docker host, create docker-compose.yml:
services:
  nginx-proxy-manager:
    image: 'jc21/nginx-proxy-manager:latest'
    container_name: npm-local
    restart: unless-stopped
    ports:
      - '80:80' # HTTP traffic
      - '443:443' # HTTPS traffic
      - '81:81' # Admin UI
    volumes:
      - ./data:/data
      - ./letsencrypt:/etc/letsencrypt
Port mappings:
80/443Handle incoming HTTP/HTTPS requests from clients81Admin interface for managing proxy hosts and SSL certificates
Start NPM:
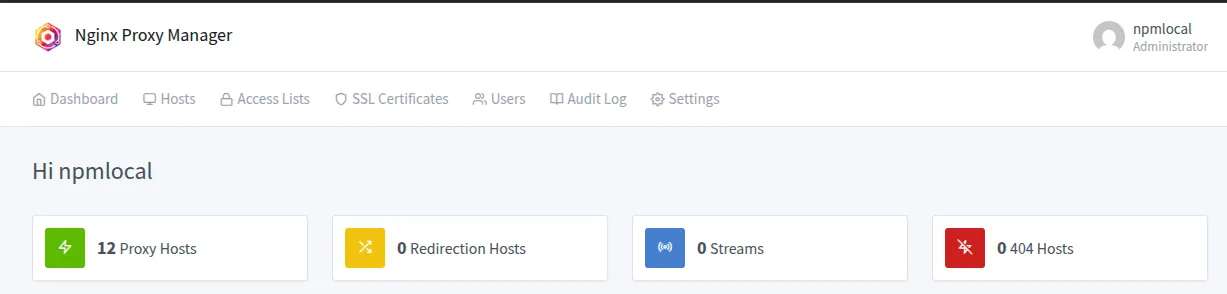
docker-compose up -dInitial Login
Access admin interface: http://10.0.10.50:81
Default credentials:
- Email:
admin@example.com - Password:
changeme
Immediately after login:
- Change email to your actual email
- Change password
- Update admin user details
After logging in, you will see a dashboard like this. Note that the 12 Proxy Hosts entries were created manually and will be empty by default.
Configure Proxy Hosts
Example 1: NPM Admin Interface (HTTP Backend)
Navigate to Proxy Hosts → Add Proxy Host
Details tab:
| Field | Value |
|---|---|
| Domain Names | npmlocal.home.byteron.com |
| Scheme | http |
| Forward Hostname/IP | 10.0.10.50 |
| Forward Port | 81 |
| Cache Assets | ☑ Enabled |
| Block Common Exploits | ☑ Enabled |
| Websockets Support | ☑ Enabled |
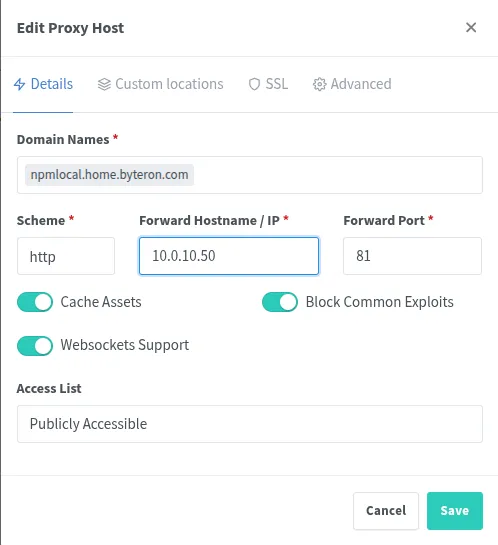
This creates a domain name for accessing NPM’s admin interface itself. You can now reach local NPM at npmlocal.home.byteron.com
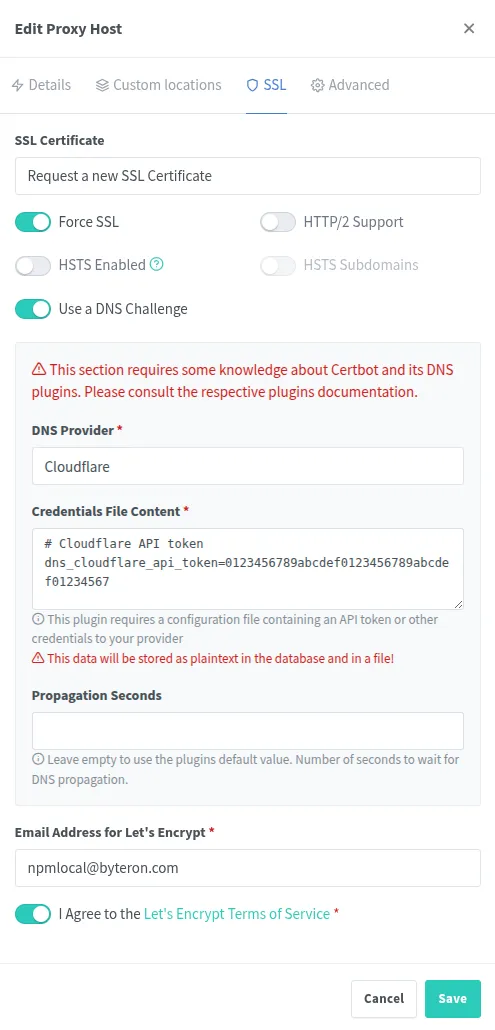
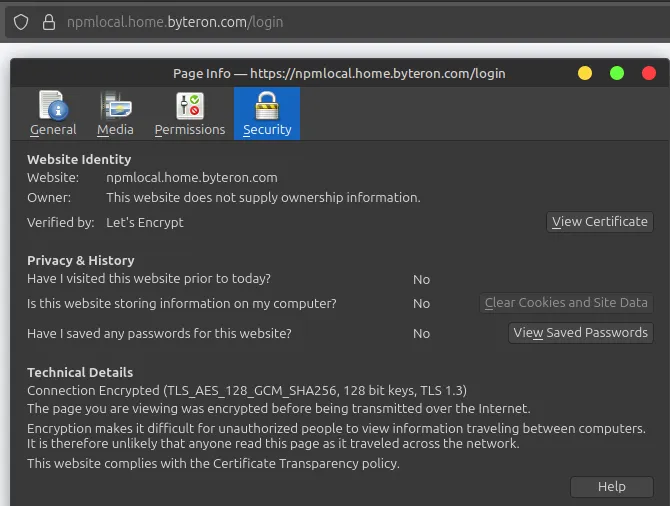
To get rid of SSL warnings and errors we can request SSL certificate using Cloudflare DNS challenge. This requires an API token which you can create on Cloudflare dashboard.
Once set up, you can visit npmlocal.home.byteron.com in your browser and see that the connection is using SSL (Lock Icon) and view the certificate we just created. Here is an example of how it appears when using Firefox.
Example 2: Proxmox
Add new proxy host:
Details tab:
| Field | Value |
|---|---|
| Domain Names | proxmox.home.byteron.com |
| Scheme | https |
| Forward Hostname/IP | 10.0.X.X (Proxmox IP) |
| Forward Port | 8006 |
| Block Common Exploits | ☑ Enabled |
| Websockets Support | ☑ Enabled |
SSL can be set up by repeating the same steps as for npmlocal.home.byteron.com
Example 3: Portainer (HTTP Backend)
Add new proxy host:
Details tab:
| Field | Value |
|---|---|
| Domain Names | portainer.home.byteron.com |
| Scheme | http |
| Forward Hostname/IP | 10.0.10.X (Portainer IP) |
| Forward Port | 9000 |
| Block Common Exploits | ☑ Enabled |
| Websockets Support | ☑ Enabled |
SSL can be set up by repeating the same steps as for npmlocal.home.byteron.com
Example 4: Homarr Dashboard (HTTP Backend)
Add new proxy host:
Details tab:
| Field | Value |
|---|---|
| Domain Names | homarr.home.byteron.com |
| Scheme | http |
| Forward Hostname/IP | 10.0.10.X (Homarr IP) |
| Forward Port | 7575 |
| Block Common Exploits | ☑ Enabled |
| Websockets Support | ☑ Enabled |
SSL can be set up by repeating the same steps as for npmlocal.home.byteron.com
SSL Certificates
The recommended approach is using Let’s Encrypt with Cloudflare DNS challenge, as demonstrated in Example 1 above.
Why Cloudflare DNS Challenge?
- Automatically generates valid SSL certificates
- Works for local domains (*.home.byteron.com)
- No browser warnings
- No manual certificate installation on devices
- Certificates auto-renew through NPM
Setup for additional domains:
The process shown for npmlocal.home.byteron.com works identically for any other service:
- Edit proxy host → SSL tab
- Request a new SSL Certificate
- Enable “Use a DNS Challenge”
- Select “Cloudflare” as DNS provider
- Enter Cloudflare API token
- Enable “Force SSL”
- Agree to Let’s Encrypt Terms
- Save
NPM handles certificate generation and renewal automatically.
Generate an API token at Cloudflare Dashboard → My Profile → API Tokens. The token needs
Zone:DNS:Edit permissions for your domain.
Alternative: Self-Signed Certificates
If you don’t use Cloudflare, NPM can generate self-signed certificates. However, browsers will show security warnings on every visit.
NPM supports multiple DNS providers (Cloudflare, AWS Route53, DigitalOcean, etc.) for DNS challenge.
Firewall Configuration (If Needed)
If you followed the main OPNsense guide, your firewall may already allow access to NPM. The main guide sets up VLANs like DMZ (VLAN10) and secure networks (SEC_LAN_IG) with appropriate access rules.
Skip this section if:
- NPM is accessible from your client devices
- You can reach
http://10.0.10.50:81(NPM admin interface)
Only configure firewall if clients cannot reach NPM. Create alias and rule:
Create Alias:
Navigate to Firewall → Aliases
| Field | Value |
|---|---|
| Name | NPM_LOCAL |
| Type | Host(s) |
| Content | 10.0.10.50 |
| Description | Local Nginx Proxy Manager |
Add Rule (if needed):
Navigate to Firewall → Rules → [Source VLAN]
| Field | Value |
|---|---|
| Action | Pass |
| Protocol | TCP |
| Source | LAN net (or VLAN net) |
| Destination | NPM_LOCAL |
| Destination Port | 80, 81, 443 |
| Description | Allow access to local NPM |
Verification
Test your setup with these quick checks:
DNS Resolution:
nslookup npmlocal.home.byteron.com
# Should return: 10.0.10.50
# For example:
Server:		10.0.0.1
Address:	10.0.0.1#53
Name:	npmlocal.home.byteron.com
Address: 10.0.10.50
# Should still return: 10.0.10.50 even if "anything" is not a real service
nslookup anything.home.byteron.comAccess Services: Open browser and navigate to your configured domains:
http://npmlocal.home.byteron.com- NPM admin interfacehttps://npmlocal.home.byteron.com- SSL version (if configured)
If services load, setup is complete.
External NPM vs Local NPM
This guide covers LOCAL NPM for *.home.byteron.com only.
LOCAL NPM (this guide):
- Handles internal services
- Uses DNSmasq wildcard on OPNsense
- Let’s Encrypt certificates via DNS challenge
- Not accessible from internet
EXTERNAL NPM (future guide):
- Handles public services (
*.byteron.com) - Uses public DNS provider (Cloudflare, etc.)
- Let’s Encrypt certificates via DNS challenge
- Accessible from internet
- Requires proper port forwarding
You can run both on same server (different ports) or separate servers. For example:
- Local NPM: ports 80, 443, 81
- External NPM: ports 8080, 8443, 82
Notes
This configuration is for LOCAL access only and for services that are not exposed to the internet. Nginx Proxy Manager becomes a single point of failure for all proxied services. Let’s Encrypt enforces rate limits (50 certificates per registered domain per week) so plan your certificate requests accordingly or use wildcard certificates. The wildcard DNS entry catches ALL subdomains under *.home.byteron.com, which can expose services unintentionally if NPM is misconfigured.
[references] ▸
-
[1.1]
Building a Secure Home Network with OPNsense — Complete OPNsense configuration
-
[1.2]
Testing Your OPNsense Setup — Verification procedures
-
[2.1]
Official Documentation — NPM docs and guides
-
[2.2]
Advanced Configuration — Custom Nginx configs
[changelog] ▸
- → Initial publication
Disclaimer
Use the information provided here at your own risk, but if you find errors or issues in this guide, leave a comment and I’ll try to address them ASAP.
Comments